

Deploying a Django project on AWS Lambda using Serverless (Part 3)
How to prepare AWS infrastructure for deploying a Django project using Terraform


To follow up my previous blog post I decided to show you how to update existing and create new AWS resources for a Django project using Terraform (infrastructure-as-code).
Terraform is an open-source infrastructure as code software tool that provides a consistent CLI workflow to manage hundreds of cloud services. Terraform codifies cloud APIs into declarative configuration files.
Terraform is a powerful tool that helps to define your AWS infrastructure as code. Using it, you can:
- Have a single source of truth for infrastructure definition and configuration.
- Easily replicate AWS infrastructure for other environments or from one AWS account to another one.
- Add the necessary updates to your AWS resources.
- Store all changes for your AWS resources in a version control system and vet them through a code review process.
- Define AWS infrastructure in a human-readable way.
In my previous blog post, you can see how to prepare AWS infrastructure manually via AWS console, now, let's take a look at how we can use Terraform to prepare all the necessary AWS resources for a Django project.
Install and initialize Terraform CLI
Step 1: Install Terraform CLI
- macOS:
brew tap hashicorp/tap
brew install hashicorp/tap/terraform
- Linux (Ubuntu/Debian)
sudo apt-get update && sudo apt-get install -y gnupg software-properties-common curl
curl -fsSL https://apt.releases.hashicorp.com/gpg | sudo apt-key add -
sudo apt-add-repository "deb [arch=amd64] https://apt.releases.hashicorp.com $(lsb_release -cs) main"
sudo apt-get update && sudo apt-get install terraform
Check Terraform CLI installation:
terraform --help
The output should be like that:
Usage: terraform [-version] [-help] <command> [args]

The available commands for execution are listed below.
The most common, useful commands are shown first, followed by
less common or more advanced commands. If you're just getting
started with Terraform, stick with the common commands. For the
other commands, please read the help and docs before usage.
Step 2: Initialize your working directory using terraform CLI
- Go to your project and create
terraformfolder
cd django-aws-lambda
mkdir terraform
cd terraform
- Create
main.tffile insideterraformfolder with the following lines:
terraform {
  required_providers {
    aws = {
      source  = "hashicorp/aws"
      version = "~> 3.37"
    }
  }
  required_version = ">= 0.15.0"
}

provider "aws" {
  region     = "us-east-1"
}
- Initialize Terraform CLI
terraform init
The output should be like that:
Terraform has been successfully initialized!

You may now begin working with Terraform. Try running "terraform plan" to see
any changes that are required for your infrastructure. All Terraform commands
should now work.

If you ever set or change modules or backend configuration for Terraform,
rerun this command to reinitialize your working directory. If you forget, other
commands will detect it and remind you to do so if necessary.
Import and update existing AWS resources using Terraform CLI
Step 3: Add VPC resource and import it
- Create
vpc.tffile insideterraformfolder with the following code:
resource "aws_vpc" "default" {
  cidr_block           = "172.31.0.0/16"
  enable_dns_hostnames = true
  enable_dns_support   = true
  instance_tenancy     = "default"
}
- Export your AWS credentials:
export AWS_ACCESS_KEY_ID=<YOUR_ AWS_ACCESS_KEY_ID>
export AWS_SECRET_ACCESS_KEY=<YOUR_ AWS_SECRET_ACCESS_KEY>
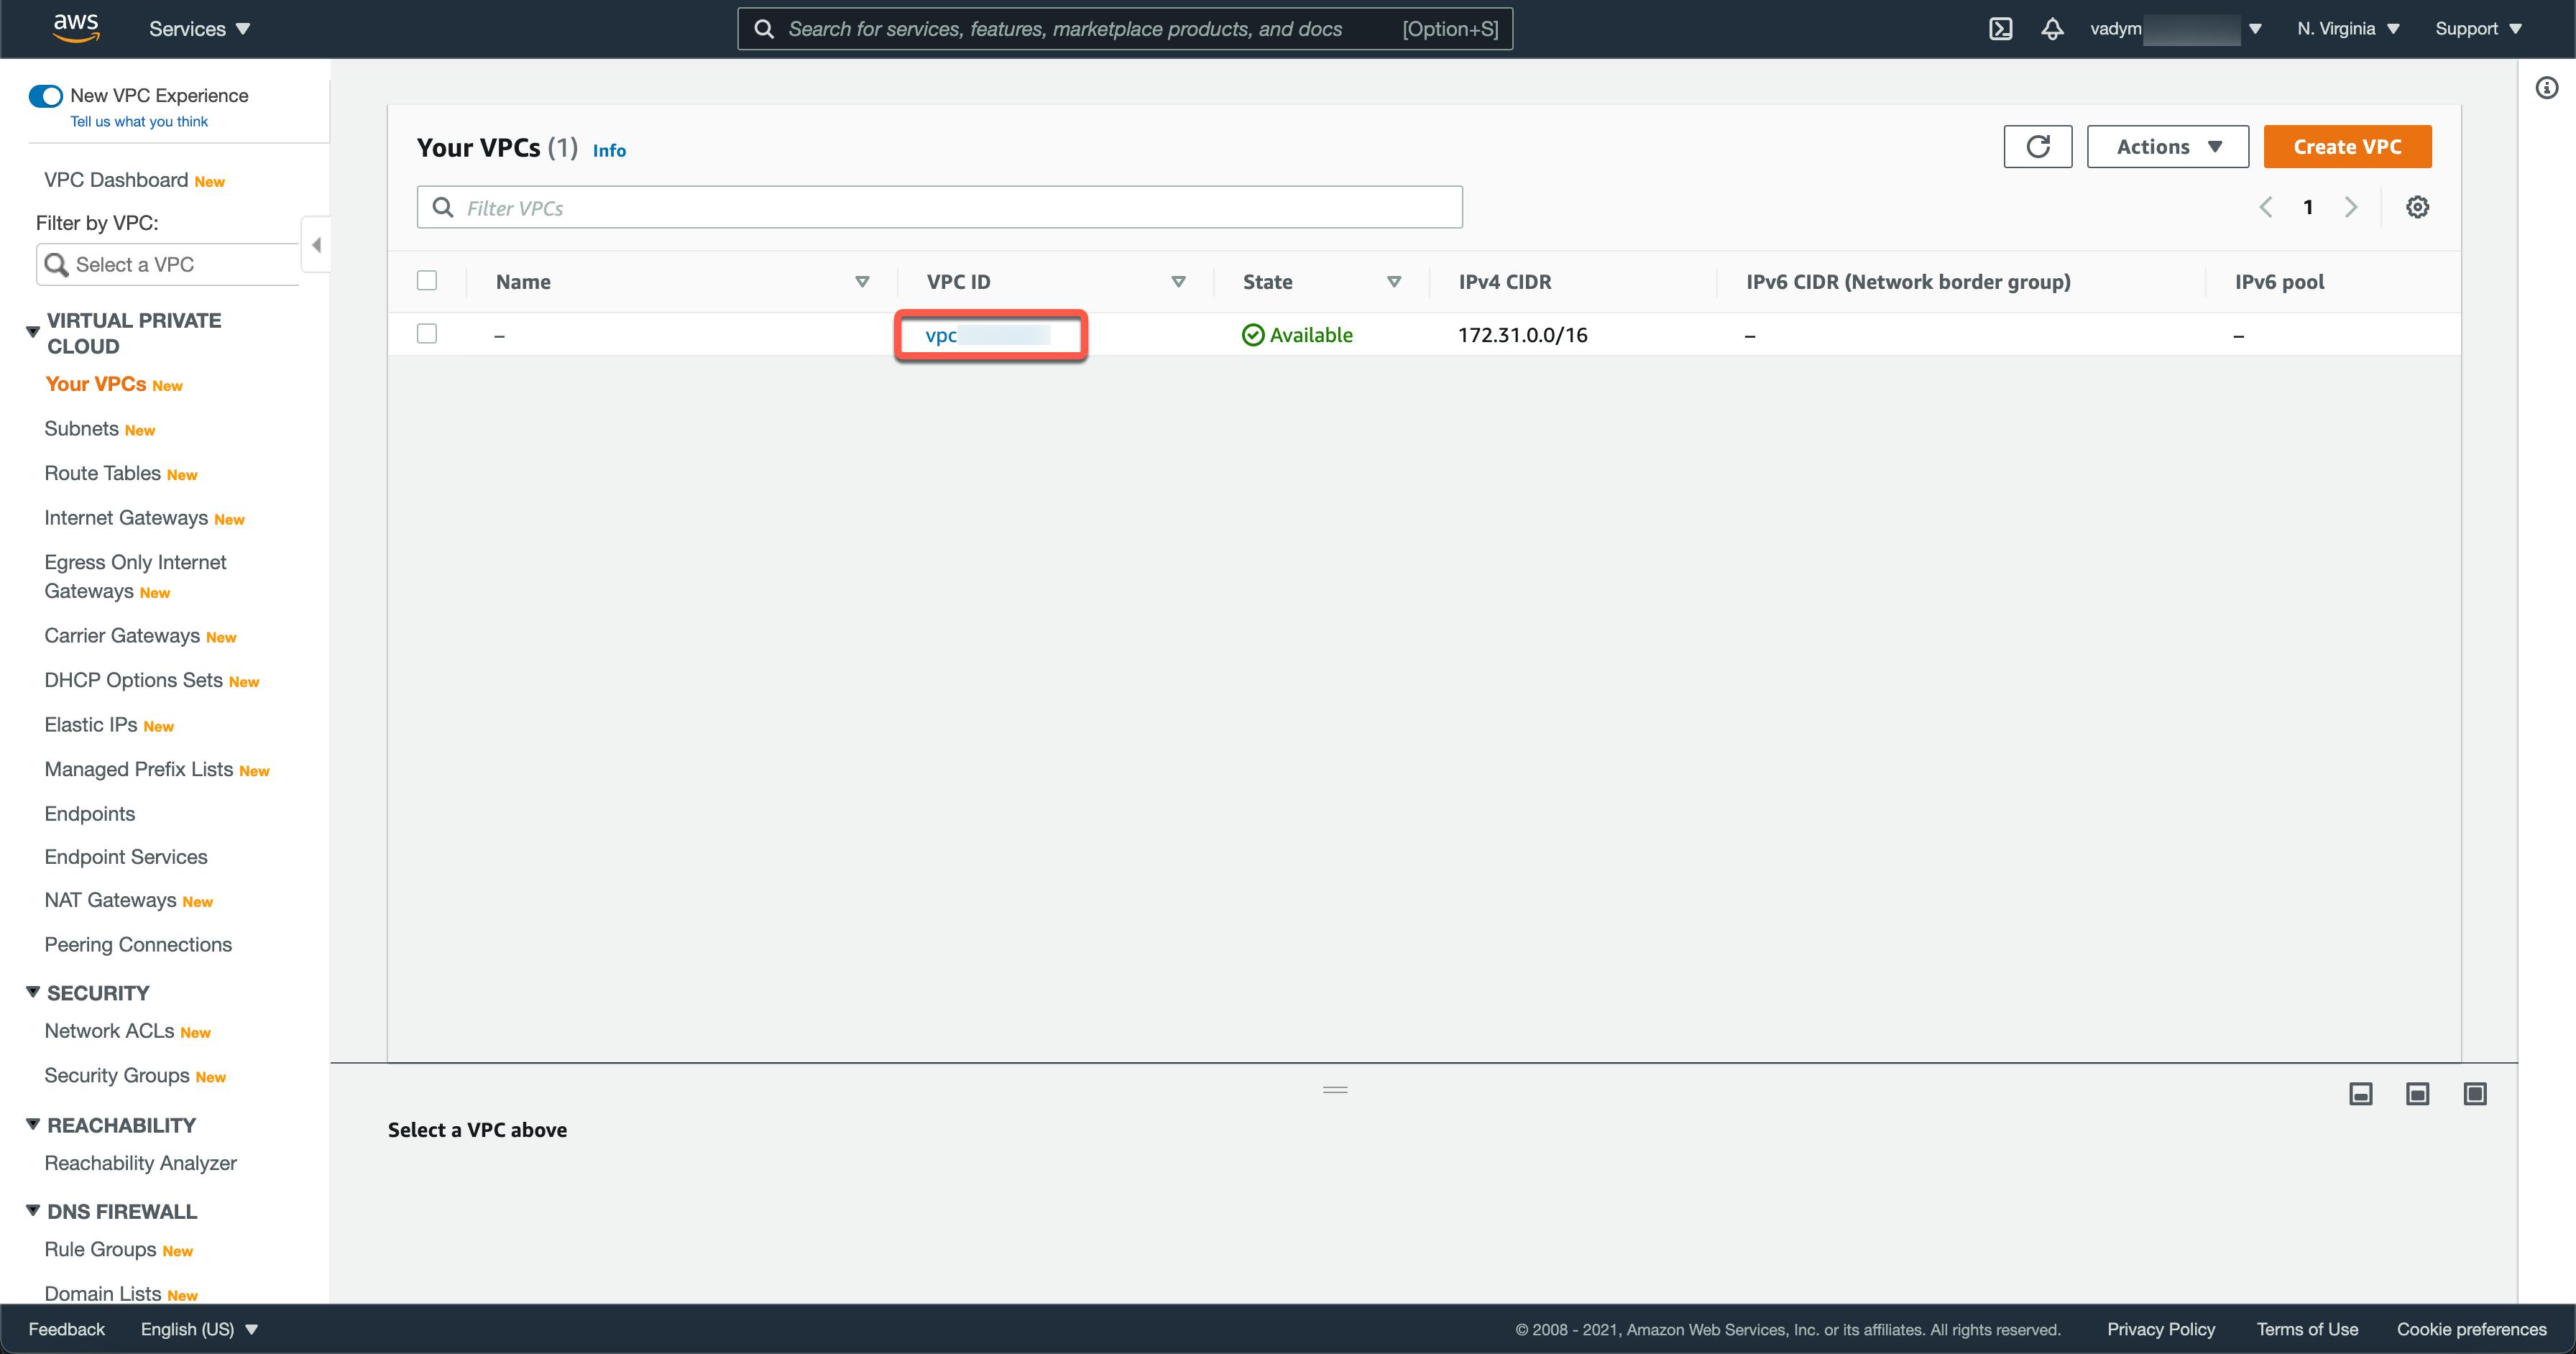
- Import existing default VPC:
terraform import aws_vpc.default <your-vpc-id>
You should go to your AWS console to get your VPC id (make sure that you use the right region)
Step 4: Add a Security Groups resource and import it
- Create
security_groups.tffile insideterraformfolder with the following code:
resource "aws_security_group" "default" {
  name        = "default"
  description = "default VPC security group"
  vpc_id      = aws_vpc.default.id

  ingress {
    from_port       = 0
    to_port         = 0
    protocol        = "-1"
    security_groups = []
    self            = true
  }

  egress {
    from_port   = 0
    to_port     = 0
    protocol    = "-1"
    cidr_blocks = ["0.0.0.0/0"]
  }

}
- Import the existing default Security Group:
terraform import aws_security_group.default <your-security-group-id>
Step 5: Check infrastructure changes and apply them
- Run
terraform plancommand to check changes to be applied for your AWS infrastructure. If there is nothing to change your output should be like this:
aws_vpc.default: Refreshing state... [id=vpc-<some-id>]
aws_security_group.default: Refreshing state... [id=sg-<some-id>]

No changes. Infrastructure is up-to-date.

This means that Terraform did not detect any differences between your configuration and the remote system(s). As a result, there are no actions to take.
- Add inbound and outbound rules for PostgreSQL database in
security_groups.tf(add the following lines insideaws_security_groupsresource)
  ingress {
    from_port = 5432
    to_port   = 5432
    protocol  = "tcp"
    cidr_blocks = ["0.0.0.0/0"]
    ipv6_cidr_blocks = ["::/0"]
  }

  egress {
    from_port        = 5432
    to_port          = 5432
    protocol         = "tcp"
    cidr_blocks      = ["0.0.0.0/0"]
    ipv6_cidr_blocks = ["::/0"]
  }
- Run
terraform plancommand to check changes again. Now, the output should look like that:
aws_vpc.default: Refreshing state... [id=vpc-<some-id>]
aws_security_group.default: Refreshing state... [id=sg-<some-id>]

Terraform used the selected providers to generate the following execution plan. Resource actions are indicated with the following symbols:
  ~ update in-place

Terraform will perform the following actions:

  # aws_security_group.default will be updated in-place
  ~ resource "aws_security_group" "default" {
      ~ egress                 = [
          - {
              - cidr_blocks      = [
                  - "0.0.0.0/0",
                ]
              - description      = ""
              - from_port        = 0
              - ipv6_cidr_blocks = []
              - prefix_list_ids  = []
              - protocol         = "-1"
              - security_groups  = []
              - self             = false
              - to_port          = 0
            },
          + {
              + cidr_blocks      = [
                  + "0.0.0.0/0",
                ]
              + description      = ""
              + from_port        = 5432
              + ipv6_cidr_blocks = [
                  + "::/0",
                ]
              + prefix_list_ids  = []
              + protocol         = "tcp"
              + security_groups  = []
              + self             = false
              + to_port          = 5432
            },
          + {
              + cidr_blocks      = [
                  + "0.0.0.0/0",
                ]
              + description      = null
              + from_port        = 0
              + ipv6_cidr_blocks = []
              + prefix_list_ids  = []
              + protocol         = "-1"
              + security_groups  = []
              + self             = false
              + to_port          = 0
            },
        ]
        id                     = "sg-5d23015f"
      ~ ingress                = [
          + {
              + cidr_blocks      = [
                  + "0.0.0.0/0",
                ]
              + description      = ""
              + from_port        = 5432
              + ipv6_cidr_blocks = [
                  + "::/0",
                ]
              + prefix_list_ids  = []
              + protocol         = "tcp"
              + security_groups  = []
              + self             = false
              + to_port          = 5432
            },
          - {
              - cidr_blocks      = []
              - description      = ""
              - from_port        = 0
              - ipv6_cidr_blocks = []
              - prefix_list_ids  = []
              - protocol         = "-1"
              - security_groups  = []
              - self             = true
              - to_port          = 0
            },
          + {
              + cidr_blocks      = []
              + description      = null
              + from_port        = 0
              + ipv6_cidr_blocks = []
              + prefix_list_ids  = []
              + protocol         = "-1"
              + security_groups  = []
              + self             = true
              + to_port          = 0
            },
        ]
        name                   = "default"
        tags                   = {}
        # (6 unchanged attributes hidden)

        # (1 unchanged block hidden)
    }

Plan: 0 to add, 1 to change, 0 to destroy.

─────────────────────────────────────────────────────────────────

Note: You didn't use the -out option to save this plan, so Terraform can't guarantee to take exactly these actions if you run "terraform apply" now.
You can see in this output that existing rules are going to be deleted and new rules are going to be added. If it is what you expected you are ready to apply all these changes.
- Run
terraform applycommand to apply all infrastructure changes to resources in your AWS account. It will show you all changes again and will ask you to confirm your changes before applying them.
Plan: 0 to add, 1 to change, 0 to destroy.

Do you want to perform these actions?
  Terraform will perform the actions described above.
  Only 'yes' will be accepted to approve.

  Enter a value: yes
Create new AWS resources using Terraform CLI
Step 6: Create variables.tf and outputs.tf files
- Create
variables.tffile insideterraformfolder with the following lines:
variable "REGION" {
  type    = string
  default = "us-east-1"
}

variable "RDS_DB_NAME" {
  type = string
}

variable "RDS_USERNAME" {
  type = string
}

variable "RDS_PASSWORD" {
  type = string
}

variable "S3_ORIGIN_ID" {
  type    = string
  default = "django-react-static-assets"
}
- Update
main.tffile to use AWS region from environment variable:
terraform {
  required_providers {
    aws = {
      source  = "hashicorp/aws"
      version = "~> 3.37"
    }
  }
  required_version = ">= 0.15.0"
}

provider "aws" {
  region     = var.REGION
}
Terraform variables allow us to use environment variables to protect secrets (like passwords) and apply the same infrastructure for different stages, regions, etc.
You should export these variables in your OS with adding TF_VAR_ before variable names, for example:
export TF_VAR_REGION="us-east-1"
export TF_VAR_RDS_DB_NAME="django_aws"
export TF_VAR_RDS_USERNAME="<your-database-master-username>"
export TF_VAR_RDS_PASSWORD="<your-database-master-password>"
export TF_VAR_S3_ORIGIN_ID="<your-s3-bucket-name>"
- Create
outputs.tffile insideterraformfolder with the following lines:
output "cf_domain" {
  value = aws_cloudfront_distribution.static_distribution.domain_name
}
output "db_domain" {
  value = aws_db_instance.django-aws.address
}
output "exec_lambda_role" {
  value = aws_iam_role.exec_lambda.arn
}
output "security_group_id" {
  value = aws_security_group.default.id
}
Step 6: Create an RDS resource
- Create
rds.tffile insideterraformfolder with the following lines:
resource "aws_db_instance" "django-aws" {
  identifier                 = "django-aws"
  allocated_storage          = 20
  storage_type               = "gp2"
  engine                     = "postgres"
  engine_version             = "12.5"
  instance_class             = "db.t2.micro"
  name                       = var.RDS_DB_NAME
  username                   = "postgres"
  password                   = var.RDS_PASSWORD
  port                       = 5432
  publicly_accessible        = true
  availability_zone          = "us-east-1a"
  security_group_names       = []
  vpc_security_group_ids     = [aws_security_group.default.id]
  parameter_group_name       = "default.postgres12"
  multi_az                   = false
  backup_retention_period    = 0
  backup_window              = "10:05-10:35"
  maintenance_window         = "sun:07:47-sun:08:17"
  auto_minor_version_upgrade = false
  copy_tags_to_snapshot      = true
  skip_final_snapshot        = true
}
Step 7: Create S3 resources
- Create
s3.tffile insideterraformfolder with the following lines to create S3 bucket, block public access, and S3 bucket policy resources:
resource "aws_s3_bucket" "static-assets-django-react" {
  bucket = var.S3_ORIGIN_ID
  acl = "public-read"
  force_destroy = true
}

resource "aws_s3_bucket_public_access_block" "public_access_block" {
  bucket = aws_s3_bucket.static-assets-django-react.id

  ignore_public_acls = false
  restrict_public_buckets = false
  block_public_acls   = false
  block_public_policy = false
}

resource "aws_s3_bucket_policy" "app_static" {
  bucket = aws_s3_bucket.static-assets-django-react.id
  policy = jsonencode({
    Version = "2008-10-17"
    Id      = "PolicyForCloudFrontPrivateContent"
    Statement = [
      {
        Sid    = "1"
        Effect = "Allow"
        Principal = {
          AWS = "arn:aws:iam::cloudfront:user/CloudFront Origin Access Identity ${aws_cloudfront_origin_access_identity.origin_access_identity.id}"
        },
        Action   = "s3:GetObject",
        Resource = "${aws_s3_bucket.static-assets-django-react.arn}/*"
      }
    ]
  })
}
Step 8: Create CloudFront resources
- Create
cloud_front.tffile insideterraformfolder with the following lines to create CloudFront distribution, and CloudFront Origin Access Identity resources:
resource "aws_cloudfront_origin_access_identity" "origin_access_identity" {
  comment = "access-identity-${var.S3_ORIGIN_ID}.s3.amazonaws.com"
}

resource "aws_cloudfront_distribution" "static_distribution" {
  origin {
    domain_name = aws_s3_bucket.static-assets-django-react.bucket_regional_domain_name
    origin_id   = var.S3_ORIGIN_ID
    s3_origin_config {
      origin_access_identity = aws_cloudfront_origin_access_identity.origin_access_identity.cloudfront_access_identity_path
    }
  }

  enabled             = true
  is_ipv6_enabled     = true
  comment             = "Some Comment"

  default_cache_behavior {
    allowed_methods  = ["GET", "HEAD", "OPTIONS"]
    cached_methods   = ["GET", "HEAD"]
    compress         = false
    target_origin_id = "S3-${var.S3_ORIGIN_ID}"

    forwarded_values {
      query_string = false

      cookies {
        forward = "none"
      }
    }

    viewer_protocol_policy = "redirect-to-https"
    min_ttl                = 0
    default_ttl            = 0
    max_ttl                = 0
  }

  restrictions {
    geo_restriction {
      restriction_type = "none"
    }
  }

  viewer_certificate {
    cloudfront_default_certificate = true
  }
}
Step 9: Create IAM resources
- Create
iamfile insideterraformfolder with the following lines to create IAM Role, IAM Policy, and Attach Policy to the Role resources:
resource "aws_iam_role" "exec_lambda" {
  name = "exec_lambda"
  path = "/"
  assume_role_policy = jsonencode({
    Version = "2012-10-17"
    Statement = [
      {
        Effect = "Allow"
        Principal = {
          Service = [
            "lambda.amazonaws.com"
          ]
        },
        Action = "sts:AssumeRole"
      },
    ]
  })
}
resource "aws_iam_policy" "exec_lambda_policy" {
  name        = "exec_lambda_policy"
  description = "Lambda policy"

  policy = jsonencode({
    Version = "2012-10-17"
    Statement = [
      {
        Effect = "Allow",
        Action = [
          "lambda:InvokeFunction",
        ],
        Resource = "*"
      },
    ]
  })
}

resource "aws_iam_role_policy_attachment" "attach_role" {
  role       = aws_iam_role.exec_lambda.name
  policy_arn = aws_iam_policy.exec_lambda_policy.arn
}
Step 10: Apply all changes to create the necessary AWS resources
- Run
terraform planto check changes that will be applied. - Run
terraform applyto create all the necessary resources.
As a result, you will have a long output with all logs and custom output we configured in outputs.tf:
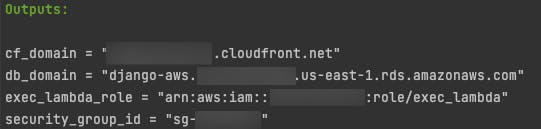
You should use these outputs in your Django and Serverless configurations.
Final Advice
I'd like to highlight that this is just an example, so your production configuration can be different. You need to be sure that your infrastructure configuration satisfies your security policy.
There is some advice:
Use a version control system to track changes in your infrastructure and for Code Review.
Don't store your terraform state in GitHub, GitLab, Bitbucket, etc.
Configure an S3 bucket as a backend for terraform, to enable collaboration:
terraform {
  required_providers {
    aws = {
      source  = "hashicorp/aws"
      version = "~> 3.37"
    }
  }
  required_version = ">= 0.15.0"

  backend "s3" {
    region         = var.REGION
    bucket         = var.BECKEND_BUCKET_NAME
    key            = var.STATE_KEY
    dynamodb_table = var.DYNAMO_DB_TABLE
    encrypt        = true
  }
}

provider "aws" {
  region = var.REGION
}
Final words
I was inspired by Mykyta Protsenko's talk "Infrastructure-as-code: evolving tools vs core principles" to write this blog post. Thanks a lot to Mykyta for all your help and support.
I'll show how to add a simple React.JS client and serve it from an S3 bucket using a CloudFront distribution in my next blog post. Follow me on Twitter @vadim_khodak or on LinkedIn so you do not miss the next posts.